Usage
This document describes the steps for creating and configuring a SAML 2.0
plugin. For this example the external website URL is https://www.example.com,
which is mapped to a folder /mysite in Zope. The Zope instance is installed
on the server filesystem at /opt/zope
You should read the Configuration document first to familiarize yourself with some of the settings this document refers to.
Set the configuration file location
Locate the zope.conf configuration file for your Zope instance and add the
following at the end before restarting Zope:
<product-config saml2plugins>
  configuration_folder /opt/zope/etc
</product-config>
If you use the zc.buildout recipe plone.recipe.zope2instance to create your Zope instance, add the following to the buildout section for the Zope instance, re-run the buildout and restart Zope:
zope-conf-additional =
    <product-config saml2plugins>
      configuration_folder /opt/zope/etc
    </product-config>
Create the plugin
In the Zope ZMI, navigate to /mysite/manage_main and, if
you haven’t done so yet, create a PluggableAuthService instance. Then,
click on the PluggableAuthService acl_users. From the dropdown
named Select type to add, select SAML 2.0 Plugin:

On the initial form, set an ID and optional title:

Click on the SAML 2.0 plugin you just created and visit the Configuration tab. It will tell you that the plugin cannot find the pysaml2 configuration file that is required:

Copy the filesystem path that it is looking for, you will need it when creating the pysaml2 configuration file below.
Create a key and certificate pair
A key and certificate are needed to cryptographically sign SAML 2.0 request
data or the SAML metadata generated by the plugin. On the filesystem, change to
the folder /opt/zope/etc and create them:
openssl req -nodes -new -x509 -keyout saml.key -out saml.crt
Get XML metadata for your identity provider
XML metadata describes how service provider nd identity provider interact. When
you choose an identity provider they will usually provide a ready-made XML file
for this purpose. Create or download this metadata XML file and store it inside
/opt/zope/etc. This example assumes the filename idp.xml.
Create a pysaml2 configuration file
Create a file at the filesystem path from the previous step. Here’s the start configuration for this test scenario:
from saml2 import BINDING_HTTP_REDIRECT


CONFIG = {
    "entityid": "https://www.example.com",
    "service": {
        "sp": {
            "name": "Testing SP",
            "allow_unsolicited": False,
            "endpoints": {
                "assertion_consumer_service": [
                    "https://www.example.com/acs",
                ],
            },
        },
    },
    "key_file": "/opt/zope/etc/saml.key",
    "cert_file": "/opt/zope/etc/saml.crt",
    "xmlsec_binary": "/usr/local/bin/xmlsec1",
    "allow_unknown_attributes": True,
    "organization": {
        "display_name": [
            "example.com samltest1",
        ],
        "name": [
            "example.com samltest1",
        ],
        "url": [
            "https://www.example.com",
        ],
    },
    "contact_person": [
        {
            "givenname": "John",
            "surname": "Doe",
            "phone": "",
            "mail": "johndoe@example.com",
            "type": "technical",
        },
    ],
    "metadata": {
        "local": [
            "/opt/zope/etc/idp.xml",
        ],
    },
}
You can either restart the Zope instance or use the button Reload configuration on the plugin’s Configuration tab in the ZMI to load the configuration. The configuration values will now show on the page.

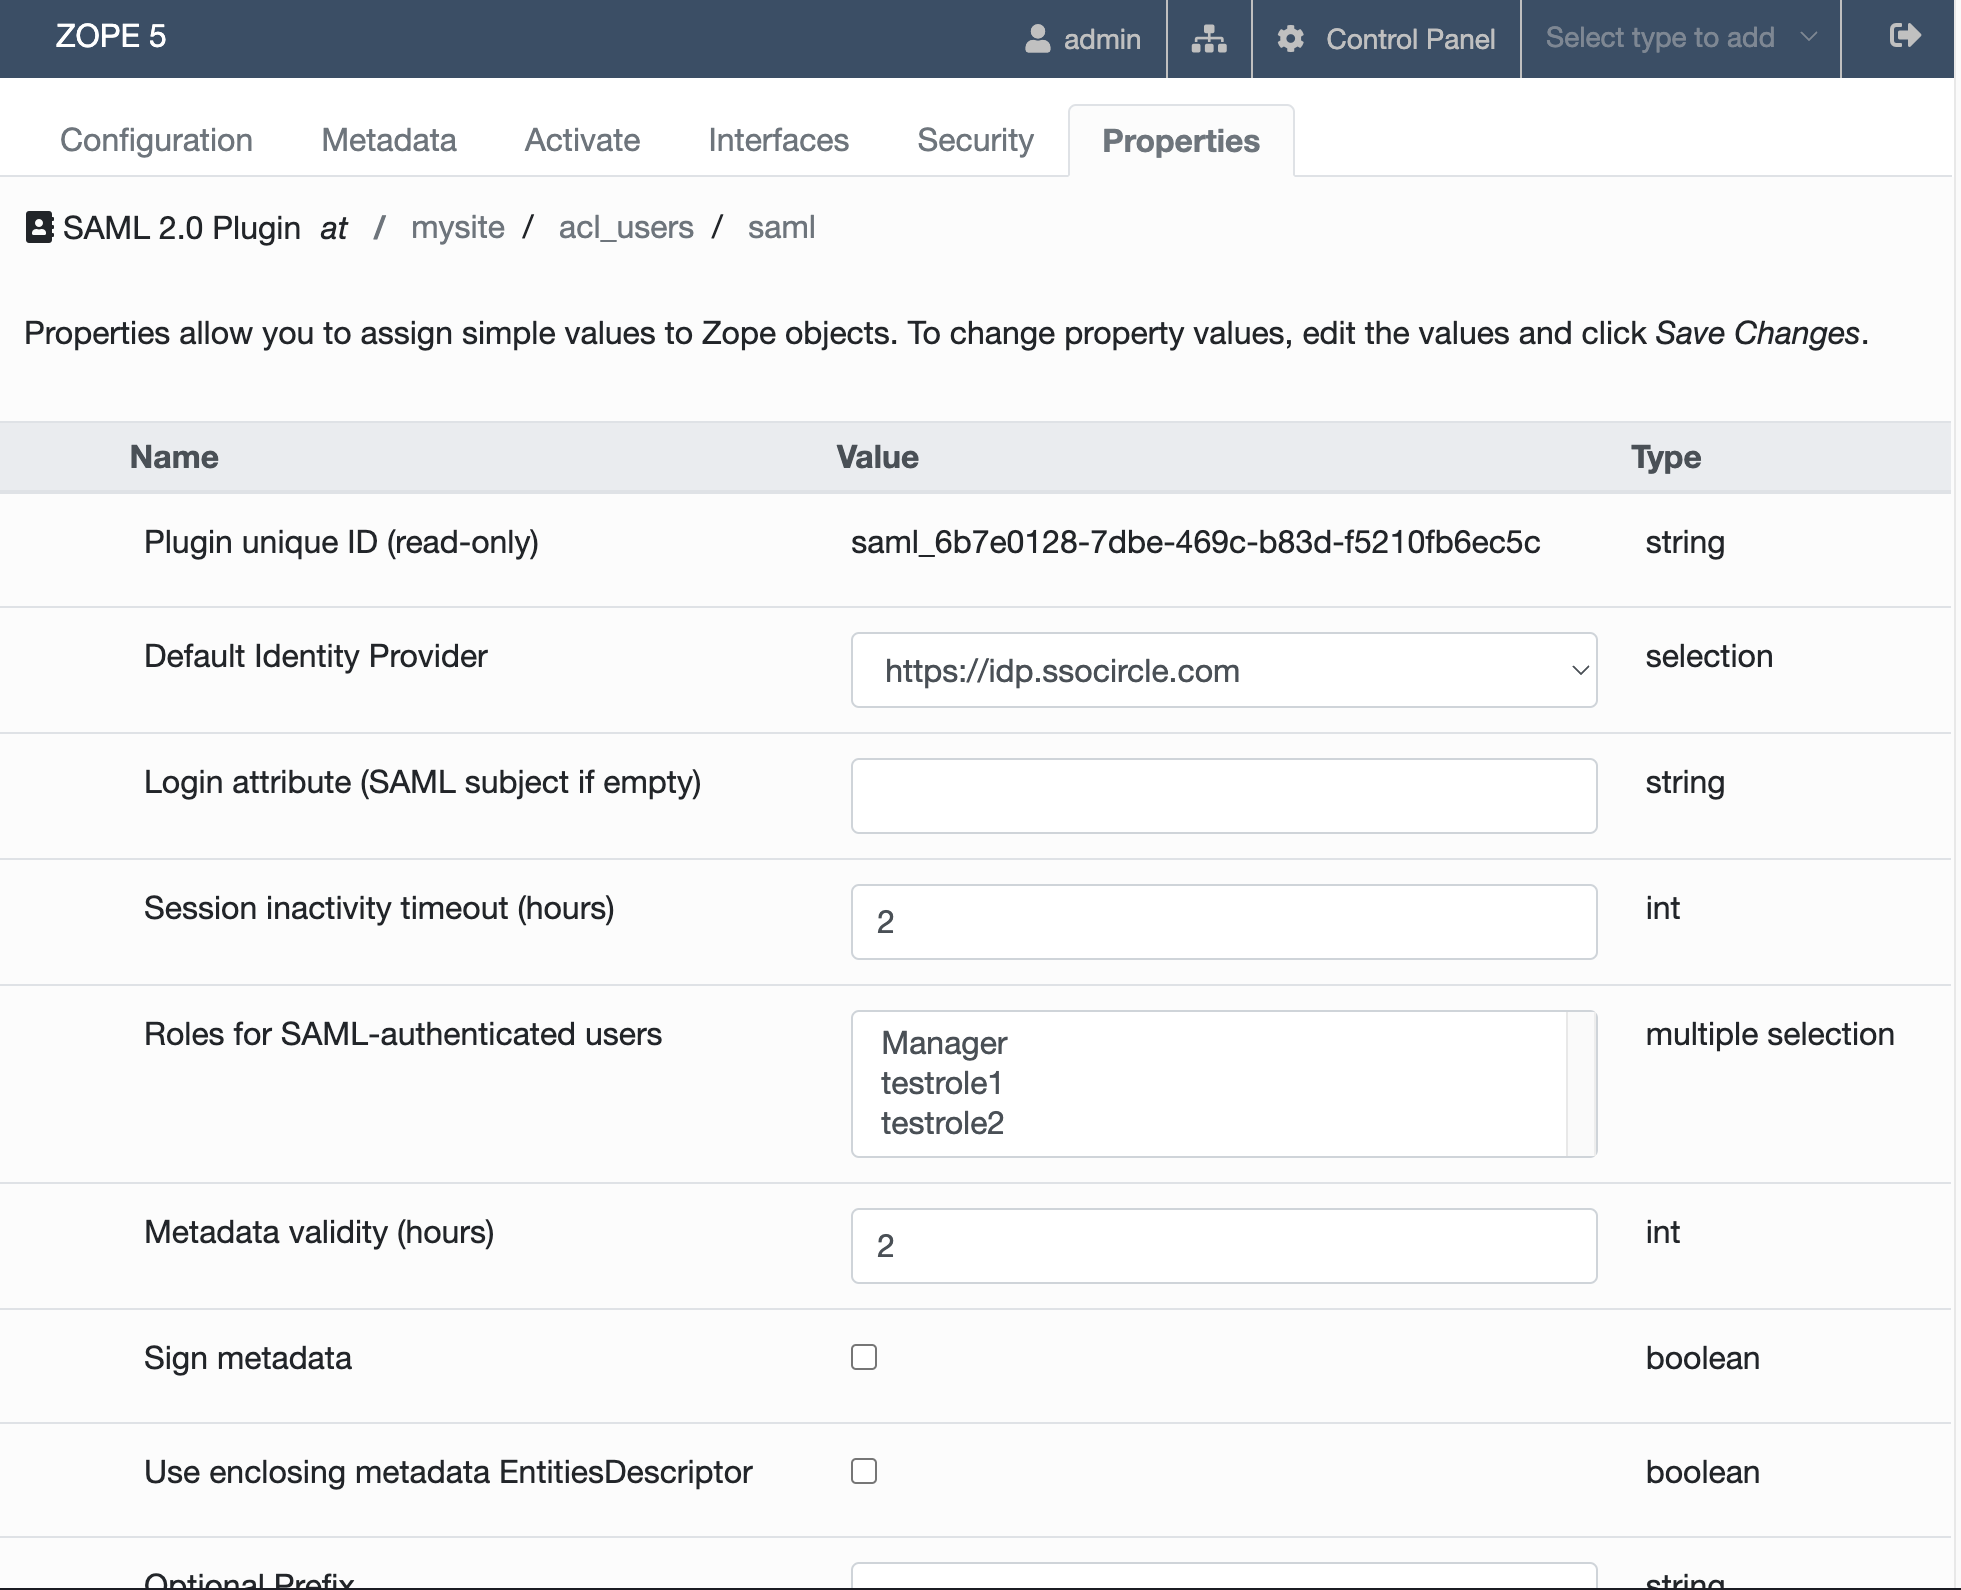
Check the SAML 2.0 plugin properties
In the Zope ZMI, click on the plugin’s Properties tab. Check the property values and adjust where needed before clicking Save. Check the Configuration document for details about each setting.
Activate the plugin
In the Zope ZMI, click on the plugin’s Activate tab. For this example we assume the plugin is the only one that is allowed to present a login form, so check all checkboxes and click Update.

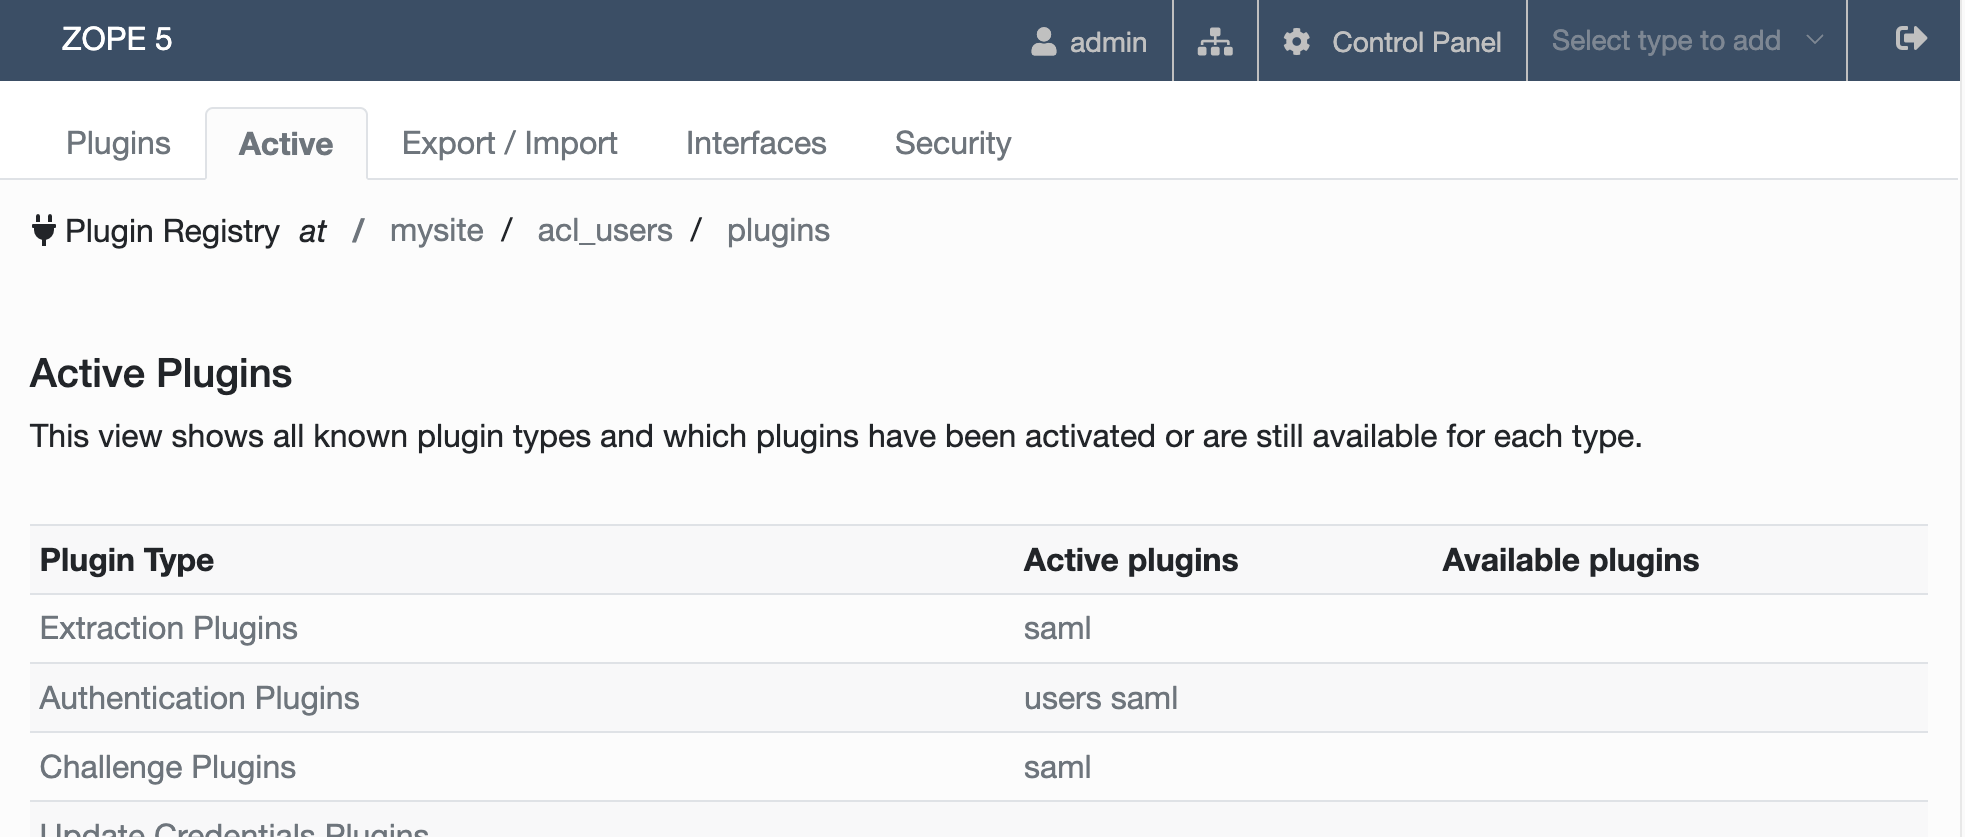
Now go back to the user folder at /mysite/acl_users/manage_main to check
these activation settings on the plugins registry. Click on plugins,
then select the ZMI tag Active. The new plugin should be the only one
listed in the Challenge Plugins line. If not, click on the
Challenge Plugins link and remove all other plugins from the Active Plugins
box.
Configure the identity provider
The identity provider you choose for handling logins needs to be configured to know and trust your website as service provider. How to do so differs between identity providers. Usually you’re asked to create a login at the identity provider and then provide information where your service provider is and how it signs its messages. Many identity providers let you upload all this data as XML file, which the plugin generates for you. In the Zope ZMI, click on the plugin’s Metadata tab. The generated metadata is shown on the page, and clicking the link Download the metadata file will download it to your computer for upload to the identity provider.
Testing it all
Go back to the root folder of your site at /mysite/manage_main. Create a
Page Template restricted_html and go to its ZMI Security tab
at /mysite/restricted_html/manage_access. Scroll down the list of
permissions until you get to View. Uncheck the checkbox in the Acquire?
column and check the checkbox in the Authenticated column. Then click Save
Changes at the bottom. With this change, the page at
https://www.example.com/restricted_html is only visible for authenticated
users. When you open a new browser with which you’re not logged into your site
at https://www.example.com and visit the page
https://www.example.com/restricted_html you should be redirected to the
identity provider for logging in. If the login at the identity provider has
been successful you should be redirected to
https://www.example.com/restricted_html and should be able to see the page.
Presenting a login link
The plugin has a publicly available method login that can be used to
manually trigger the login flow to the identity provider and back to your Zope
instance. Simply create a link or a button that links to the method. In the
example case used in this document the link would point to
https://www.example.com/acl_users/saml/login. Using rewrite rules in your
front-end web server you can shorten that to e.g.
https://www.example.com/login and proxy to the internal path in
Zope.
You can add additional information to that link with a query string:
the query string variable
idpcan be used to select a specific identity provider if you have more than one. Take the value you see in the select list Default entity provider on the plugin’s Properties ZMI tab and quote it to an URL-safe format by applying Python’surllib.parse.quote. An example would beidp=https%3A//idp.ssocircle.com.to redirect the user back to a specific page on your site after successful login at the identity provider you can pass the query string variable
came_from, for examplecame_from=/logged_in.html.